Inference with ONNX Runtime & Azure ML
Introduction
At Aspiris, we are building products for the manufacturing industry that leverage Machine Learning for process optimization. Our models are trained on datasets containing various process control parameters—such as temperature, pressure, and feed rate—and their corresponding outputs. The goal is to be able to determine the optimal values of these parameters to improve overall efficiency, reliably predict the output, and quickly adapt the parameters in response to changes in input feed composition or desired outcomes.
As we continue building the product, we’ve made, and are still making, key decisions around the Machine Learning model architecture, representation format, inference providers, and MLOps tooling. We’re also balancing a 0-to-1 mindset—favoring rapid prototyping—with the need to avoid early lock-in to any particular toolset. In this post, I’ll share a portion of our technical journey—using ONNX for model representation and Azure ML for deployment—and the rationale behind choosing these two technologies. In future posts, I’ll dive deeper into our broader learnings from building the product—both from a technology perspective (model training, MLOps, etc.), and our approach to customer discovery and iterative product development.
Why ONNX?
ONNX (Open Neural Network Exchange) is a set of open-source libraries that helps represent machine learning models developed in various frameworks, along with runtimes to deploy your models. The biggest benefits of using ONNX over other formats for us are:
i) interoperability - we can use different ML frameworks (PyTorch, TensorFlow, SciKit-Learn) to develop our models, and convert them into a common format for deployment.
ii) inference performance - ONNX runtime optimizes for the best performance, regardless of the hardware being used.
iii) deployment flexibility - we can deploy the models on different hardware and cloud environments.
Why Azure ML?
The reason we chose Azure ML was simple—Azure offers a startup program that provided us with credits to train and deploy our models. This is especially valuable, as it allows us to focus on building the product and finding product–market fit a little longer, without immediately shifting our attention to fundraising. Other cloud providers offer similar programs, but Azure’s application process and eligibility criteria were by far the simplest. For any founders building in the cloud, I highly recommend applying to their startup program: https://learn.microsoft.com/en-us/microsoft-for-startups/
If you are not familiar with Azure ML, it is an end-to-end solution for all your Machine Learning training and operational needs. Think of it as a one-stop shop to store your datasets, train your models, version and register them, and run inference using those models on compute instances.
Implementation
➡️ All the code to train the model and deployment is available here: https://github.com/aspiris/azureml-onnx-demo. The src folder contains a Jupyter notebook with step-by-step instructions that can be run on a local machine or a cloud instance.
Model Training
In this post, we will train a simple model on the Iris dataset (https://archive.ics.uci.edu/dataset/53/iris). Once we have a trained model, the focus will be on the benefits of using ONNX and Azure ML for inference. In later posts, we will delve into more details of model training and MLOps with MLflow.
First, we create a virtual environment using conda, and configure the notebook to use this environment:
$ conda create --name azureml-onnx-demo
$ conda activate azureml-onnx-demo
$ conda install scikit-learn pandas numpy skl2onnx onnxruntime
$ conda list
ONNX provides converters to convert models from different frameworks to ONNX format. Here is the code to export the scikit-learn model to ONNX:
from skl2onnx import convert_sklearn
from skl2onnx.common.data_types import FloatTensorType

# Define the initial type based on the shape of training data
initial_type = [('float_input', FloatTensorType([None, X_train.shape[1]]))]

# Convert the scikit-learn model to ONNX
onnx_model = convert_sklearn(model, initial_types=initial_type)

# Save the ONNX model to a file
with open("iris_rf_model.onnx", "wb") as f:
	f.write(onnx_model.SerializeToString())

print("Model exported to iris_rf_model.onnx")
Note that we used convert_sklearn and provided information about the input type (number of
features), but we can also use to_onnx which infers the type:
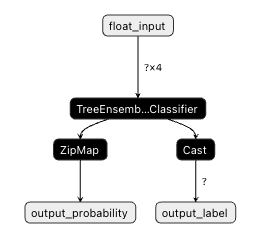
to_onnx(model, X[:1])Once exported, we can visualize the model’s graph through tools like netron. Here is what the RandomForestClassifier looks like:
Deployment on Azure ML
The starting point for our deployment is setting up an Azure ML workspace, which is the top-level container for all Machine Learning assets related to a project. The workspace will host our models and deployments. We can create it through the Azure portal, CLI, or the Python SDK.
Registering the Model
Once a workspace is created, we can register the model to it so that it can be used for inference. Registering a model creates a version of it in the workspace. We can have multiple versions of the same model (for example, after further tuning or experimenting) and can serve them in a blue-green deployment.
For Python SDK, we install these packages in the environment:
$ conda install azure-ai-ml azure-identityfrom azure.ai.ml.entities import Model
model = Model(
path="iris_rf_model.onnx",
name="iris-rf-onnx",
description="Random Forest model trained on Iris dataset (ONNX format)",
type="custom_model",
)
registered_model = ml_client.models.create_or_update(model)
print(f"Registered model: {registered_model.name}, version: {registered_model.version}")Once the model is registered with the workspace, it can be referred to in our deployment by
name: azureml:iris-rf-onnx:1. More on this later.
Optional but Highly Recommended: Local Testing with Inference HTTP Server
Since we are going to use our own scoring script, it is highly recommended to test it locally
using the inference HTTP server first. For that, we need two things: the scoring script and a
sample input file. But first, we need to add the azureml-inference-server-http to the conda environment
(using pip because it is not available in the conda-forge channel):
$ pip install azureml-inference-server-httpHere is the scoring script and the sample input:
import onnxruntime as rt
import numpy as np
import json
import os

def init():
    global session, input_name, label_names

    model_path = os.path.join(os.getenv("AZUREML_MODEL_DIR"), "iris_rf_model.onnx")
    session = rt.InferenceSession(model_path)
    input_name = session.get_inputs()[0].name
    label_names = ["setosa", "versicolor", "virginica"]

def run(raw_data):
    try:
        data = json.loads(raw_data)["data"]
        inputs = np.array(data, dtype=np.float32)
        outputs = session.run(None, {input_name: inputs})
        preds = outputs[0].tolist()
        return [label_names[int(p)] for p in preds]
    except Exception as e:
        return {"error": str(e)}
{
"data": [
[5.1, 3.5, 1.4, 0.2],
[6.2, 3.4, 5.4, 2.3]
]
}Now we are ready to serve the model locally. This launches a server locally, which serves the model for inferencing. Here’s the command, and the output:
$ azmlinfsrv --entry_script ./src/score.py --model_dir ./src/
...
2025-04-20 22:36:14,484 I [84879] azmlinfsrv.user_script - Invoking user's init function
2025-04-20 22:36:14,495 I [84879] azmlinfsrv.user_script - User's init has completed successfully
2025-04-20 22:36:14,497 I [84879] azmlinfsrv.swagger - Swaggers are prepared for the following
versions: [2, 3, 3.1].
2025-04-20 22:36:14,497 I [84879] azmlinfsrv - Scoring timeout is set to 3600000
2025-04-20 22:36:14,497 I [84879] azmlinfsrv - Worker with pid 84879 ready for serving traffic
We can send a request with sample input to test the response:
$ curl -X POST 127.0.0.1:5001/score -H "Content-Type: application/json" -d @./src/sample_input.json

["setosa", "virginica"]
Endpoint Setup
Now we are ready to set everything up in Azure ML. There are multiple ways to deploy a model to Azure ML for inference - serverless and online endpoints for real-time inference, and batch endpoints for long-running batch inference. We are going to deploy to an online endpoint for real-time inference. This gives us the most flexibility in terms of using our own custom models and scoring scripts. For our purposes, Azure’s Managed online endpoints provide the best balance of flexibility and low overhead compared to deploying on Azure Kubernetes Service.
The endpoint defines the inbound configuration for our inference endpoint, including the authentication type. This is what external users/services will call to get the predictions from the model. The endpoint, behind the scenes, points to one or more deployments, which brings together the model with an execution environment and a scoring script. This diagram provides a container-level view of these concepts.

A container level view of Azure ML resources
(credit: microsoft)
We will go through the steps of creating the endpoint, environment, and the deployment.
from azure.ai.ml.entities import ManagedOnlineEndpoint

endpoint = ManagedOnlineEndpoint(
    name="iris-rf-endpoint",
    description="Online endpoint for Iris RF ONNX model",
    auth_mode="key"
)

ml_client.online_endpoints.begin_create_or_update(endpoint).wait()

print(f"Endpoint '{endpoint.name}' created.")
from azure.ai.ml.entities import Environment, ManagedOnlineDeployment, CodeConfiguration
# Register the environment
env = Environment(
name="iris-rf-onnx-env",
image="mcr.microsoft.com/azureml/openmpi4.1.0-ubuntu20.04",
conda_file="./conda.yml",
description="Environment for ONNX model inference",
)
ml_client.environments.create_or_update(env)deployment = ManagedOnlineDeployment(
name="iris-rf-deployment-blue",
endpoint_name=endpoint.name,
model=registered_model.id,
environment=env,
code_configuration=CodeConfiguration(
code="./", # folder containing score.py
scoring_script="score.py"
),
instance_type="Standard_DS3_v2",
instance_count=1
)
ml_client.online_deployments.begin_create_or_update(deployment).result()The final step can take several minutes. But once it is deployed successfully, we can test it using either a REST client or through the code:
# Test the blue deployment with some sample data
ml_client.online_endpoints.invoke(
    endpoint_name=endpoint.name,
    deployment_name="iris-rf-deployment-blue",
    request_file="./sample_input.json",
)
This should provide an output like:
'["setosa", "virginica"]'Conclusion
My goal for this is to demonstrate the benefits of using ONNX and Azure ML for model deployment. In later posts, I plan to share the details of training an advanced model and the entire lifecycle of MLOps, which includes managing multiple datasets, different experiments and versions of models, and the pipelines to automate the steps of training and delivery. There is a lot of exciting and ongoing work being done in the MLOps space, and I look forward to learning and sharing more.